

Should You Actively Manage Your Trades?
Should You Actively Manage Your Trades?
Tom Dante notes: stop moaning and start improving (part 2)

In part 1 of this stack series, I outlined three key questions — as stated by Tom Dante (@Trader_Dante on Twitter) in his “Stop Moaning And Start Improving Part 2” video — traders can look at to review and improve their performance:
How can I make more money from my winners?
How can I lose less money on my losers?
How can I generate more winning ideas?
A very simple way of finding an answer to the first question (though this could help with the second question too) is to figure out whether you should be actively managing your trades, and if so, how. That’s what today’s stack — part 2 in this series — is going to focus on.
If you missed part 1, I recommend you read that first.
I also recommend you take the time to watch Tom’s full video, whether before or after reading my notes, to really get the most out of it. My notes simply share my key takeaways and insights — they don’t detail all the stories and examples that Tom discusses, which are both highly educational and entertaining!
Active trade management vs walking away
A lot of people set stop losses and targets when they get into a trade, but don’t see the trade through to the original stop or target — in other words, they actively manage their trade.
For instance, you may use a trailing stop loss and get stopped out prematurely that way, or you may get out before the stock hits your target because you don’t like the price action. I’ve certainly done both and, like many people, get mixed results from such active trade management. Sometimes it saved me money, and at other times it cost me money.
With that in mind, Tom strongly encourages you to look at trades you actively managed, and see whether — on balance — doing so makes you more money than if you had just let those trades run until they had hit either your target or your stop loss, no matter how long it took. As he said at 10:48:
“The answer to this question is of utmost importance, because if your record clearly shows that, over the long run, you’re scr**ing things up by managing trades, you’ve just found your own personal holy grail. […]
“If you find that you can make more money through less work, surely that’s what everybody wants? And it is less work, physically and emotionally, to be able to walk away.”
Making more money by walking away also makes it much easier to be a part-time trader, of course. (That said, just following simple, mechanical rules to manage your trades often also combines very well with another job.)
Why you must find the answers for yourself
To all those who ask me (or other traders online) whether they should be managing their trades or not, I always respond in the same way: go back through your past trades, and find out what works best for you based on your track record. In my opinion, this is the only way that you can figure out the correct answer for yourself.
More importantly, figuring out the answer for yourself, supported by the hard numbers of your own journal, will enable you to have conviction. During the trading day, when you feel unsure about whether to get out of the trade early or to wait for either your stop or your target to be hit, think about what your hard numbers told you. Put the odds in your favour — do what’s historically worked better for you.
But if you don’t know your own numbers, you haven’t really got anything to go on. You can try taking someone else’s advice, but — inevitably — there’ll be trades where that turned out the wrong thing to do. And because you lacked conviction to begin with, this makes you prone to strategy hopping, or taking other random actions or trades. In turn, this will prevent you from achieving consistency.
With that in mind, I strongly recommend building a foundation first. Know your numbers, so you know your edge. So you know whether you’re better off actively managing your trades or not. Thinking that you know it won’t cut it when the inevitable losing streak comes along.
If you truly know your edge, and whether or not actively managing your trades hurts your bottom line, it’s far less likely you’ll face problems like indecision when trading. (Which is an example of what I meant in part 1 about how you can address psychology, at least to some extent, by looking at your numbers.)
Opportunity capture
Going back to Tom’s video, he goes through an interesting example from 11:33, where a student of his actively managed a trade, closing it well before their target was hit, and in doing so missed out on a huge chunk of the opportunity.
This links to another of Tom’s suggestions: checking how much of the opportunity you are capturing (within your time frame, of course), and how you can capture more. This is a particularly important thing to check for if you trade without targets.
(I don’t think that conflicts with what many great traders say about you just need to find an edge, then turn it over as often as you can. Sure, you don’t need to capture the full move to be wildly profitable, but being able to capture more of it would certainly improve your bottom line.)
Getting out too early
Now, again, if you find yourself constantly getting out of trades too early, I refer you back to the quote from Tom that I included in part 1:
“The reason you came out early is ‘cause you do not categorically know, over a large sample size, that holding is the right thing to do, right?”
With that in mind, you must collect the necessary numbers. However, you’ll also need to figure out how you’re going to take that information and use it to improve. For instance, you could test out different theoretical management techniques that make sense to you and can work as simple, hard rules within your system — different types of trailing stops, for example. More on that later.
Remember that having a sound system is only part of the game. You also need to have conviction in it, or it’s extremely doubtful that you’ll be able to stick to it in the long run. This type of analysis is one way of developing that conviction.
Getting out too late
In the recent environment, I’ve actually been having the opposite problem: getting out too late. So I’ve been experimenting with ways of doing better in that respect. One thing that I’ve found to help me is to actually set targets (based on levels where I’m anticipating resistance or based on risk multiples). Previously, more often than not, I relied on my trailing stop alone, or sold into a parabolic move.
And yes, learning to sell quicker will no doubt result in me getting out far too early when we head back into a roaring bull market. But I am already anticipating this, and am ready to give stocks more room when the environment changes. I also can’t see the harm of learning to adapt to different environments, so long as I continue to manage and allocate risk accordingly.
Market conditions and situational awareness matter, of course, but that doesn’t mean you shouldn’t crunch your numbers. Rather, I think the lesson is to not crunch them blindly, but also consider the reasons behind your results, and what factors might be contributing to them.
More importantly, be sure to actually act on your findings. Crunching your numbers is very commendable, but what really matters is what you do with the results.
Using Excel to crunch your numbers
First things first: I’m not an Excel wizard, but my skills are good enough to get the job done. Most notably, I like to avoid macros. But I’m sure other people can take Tom’s ideas and automate the calculations far better than I can, which I’d love to see you share in the comments below.
There is, however, also a good side to my more basic approach: if you have been inspired to invest in yourself by actually looking into your numbers, you don’t need to face any steep technical learning curves.
Step 1: Log whether you actively managed the trade
Add a new column to your trade log, titled ‘Actively managed?’ or similar. For each trade, input either ‘Yes’ or ‘No’. Column D in the screenshot below illustrates what I mean.
Tip: To make life a little easier and prevent typos, you can use a drop-down list via data validation:
Go to the ‘Data’ tab in Excel.
Click ‘Data Validation’ under ‘Data Tools’.
Select ‘List’ under ‘Allow:’.
Type ‘Yes,No’ under ‘Source’.
Click ‘OK’.
Step 2: Record what would have happened if you hadn’t managed the trade
Add another new column that asks ‘What if not managed?’ or similar, like column E in the screenshot below:
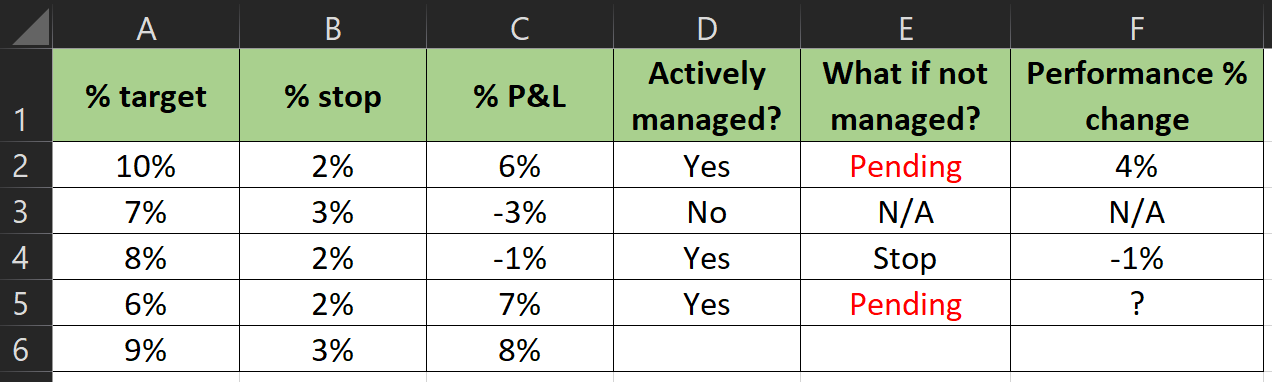
Suppose the table above is your Excel journal (note that it only includes the columns needed for these calculations, and assumes you are already collecting the information from columns A–C). Then the formula in E2 would be:
=IF(D2="","",IF(D2="No","N/A","Pending"))
Copy and paste that formula into the rest of column E. Where the cell in column E returns “Pending”, that’s your cue to manually overwrite the formula with ‘Target’ or ‘Stop’, depending on which would have hit first if you hadn’t actively managed the trade. (You’ll likely have a time gap between when you exit the trade and when the stock hits either target or stop, so you’ll probably be completing this column a little while after closing the trade.)
I appreciate manually overwriting Excel formulas feels a bit odd, but it’s the best method I could come up with that avoided using macros while still automatically populating the rows for trades I hadn’t actively managed. Moreover, from where I stand, the most important thing is that it does actually work for obtaining the information needed.
To help you quickly identify which fields to overwrite, you could apply a conditional formatting formula, as I did in the screenshot above, with the red font for any cells in column E containing “Pending”.
Step 3: Determine the impact on individual trades
Add a third new column titled ‘Performance % change’ or similar. If your journal was the table in the screenshot earlier, use the following formula in F2:
=IF(E2="","",IF(E2="N/A","N/A",IF(E2="Pending","?",IF(E2="Target",A2-C2,-B2-C2))))
Copy and paste that formula into the rest of column F.
Step 4: Determine the impact on your bottom line
Now that you have hard numbers on how actively managing your trades impacts your performance on an individual trade level, you need to determine the impact on your overall performance. Does actively managing your trades, on balance, make you money, and if yes, how significant is the difference?
On a separate tab in my journal where I collect various other high-level stats, I have a table that starts like this:
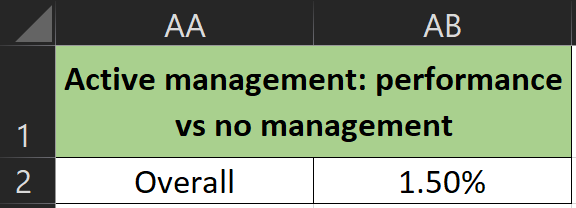
The formula in AB2 is:
=AVERAGEIFS(F:F,D:D,"Yes")
Note that this formula assumes the above table is on the same tab as the first table shown earlier (A1:F6). If they are on different tabs, you will need to add ‘[tab name]!’ before ‘F:F’ and ‘D:D’ in the formula in AB2.
Step 5: Draw your conclusions
The straightforward way of drawing your conclusions is checking whether AB2 returns a positive or a negative percentage:
If it’s positive, your active trade management is making you money.
If it’s negative, congratulations, you can actually improve your bottom line by doing less work (by not managing your trades)!
However, I do feel obliged to provide a couple of caveats:
The smaller your sample size, the less significant your results. (Sorry.)
But the larger the percentage (in either direction), the likelier it is that your findings are significant — at least for the market environment during which you placed those trades.
Things may also get complicated if you have a large sample size, but a small positive percentage in AB2. That suggests that active trade management does make you more money, but only marginally.
The question you’ll then need to answer for yourself is whether you’re going to put in many extra hours of work to lock in that small additional gain. This likely depends on factors like lifestyle, and whether or not you’re a full-time trader.
Experimenting with different theoretical management techniques
Another thing you may want to look into, before deciding whether those extra hours are worth the extra money, are how your results would change if you experimented with different theoretical management techniques like trailing stops.
For example, what would happen if you trailed all your trades with a fixed stop — say 5%? Or if you kept moving your stop up (or down, if you’re short) to each major swing high (or low)? Or if you always took profits at a fixed %? Or at a fixed risk multiple?
Maybe you’ll find a marginal difference. Maybe it’ll have a negative impact. Or maybe it’ll dramatically improve your bottom line.
Mark Minervini’s eye-opening moment
In his book Trade Like a Stock Market Wizard: How to Achieve Super Performance in Stocks in Any Market, Mark Minervini shared his ‘loss adjustment chart’ (Figure 12.3, page 279) and his ‘Loss Adjustment Exercise’.
Long story short, Mark Minervini used to be undisciplined about cutting losses. Although the concept sounded logical to him, he would occasionally break the rule. Therefore, as an experiment, he decided to take his journal, adjust his losses to an arbitrary 10% (making sure that he accounted for some winners turning into losers, as well as making some of his smaller losses bigger).
The result? Over 20 trades, his compounded return changed from -12.05% to 79.89%.
“[T]he effect on my performance was amazing. […] The hypothetical improvement in the overall portfolio performance seemed too dramatic to be believed. I rechecked the math two or three times, and the numbers were correct. Instead of having a double-digit percentage loss in my portfolio, I would have had a gain of more than 70 percent.
“Is it possible that such a small alteration could have such a dramatic impact on performance? Absolutely! This revelation was a pivotal moment in my trading. I was convinced that risk management was the key to success. From that point on, I grew very risk adverse, and my results improved dramatically.”
I know this isn’t active trade management exactly, but I nevertheless thought it a good story to share here. If you try different hypothetical techniques on your past trades, thereby accounting for both winners and losers, you may just find your own lightbulb moment that permanently alters your results and discipline.
More content like this
I hope you enjoyed part 2 of this series! The remaining parts are as follows:
Part 3: Allocating risk (i.e. position sizing) according to different variables.
Part 4: Generating new ideas and coming up with new patterns.
To get those parts straight to your inbox, as well as other future articles, please do subscribe:
Please do also give this post a like and share it with other traders if you found it useful.
I’m also always looking to get better, both as a trader and as a writer, so do let me know if you have any constructive feedback in the comments below. Alternatively, you can message me on Twitter or email me at kayklingson@yahoo.com.
All my stacks related to journaling are here. All my Tom Dante notes are here.
The Trading Resource Hub’s full archive is here.